

Guide 01 · Getting started
Workspace Setup
Create a workspace, configure your brand and customer questions, and complete your first measurement.
PDF · 12 pages · 1.3 MB · September 2026
In this guide
Chapter links open the PDF in a new tab.
- Page 1: Your setup route
An overview of the setup steps and what to prepare.
Read page 1 as text
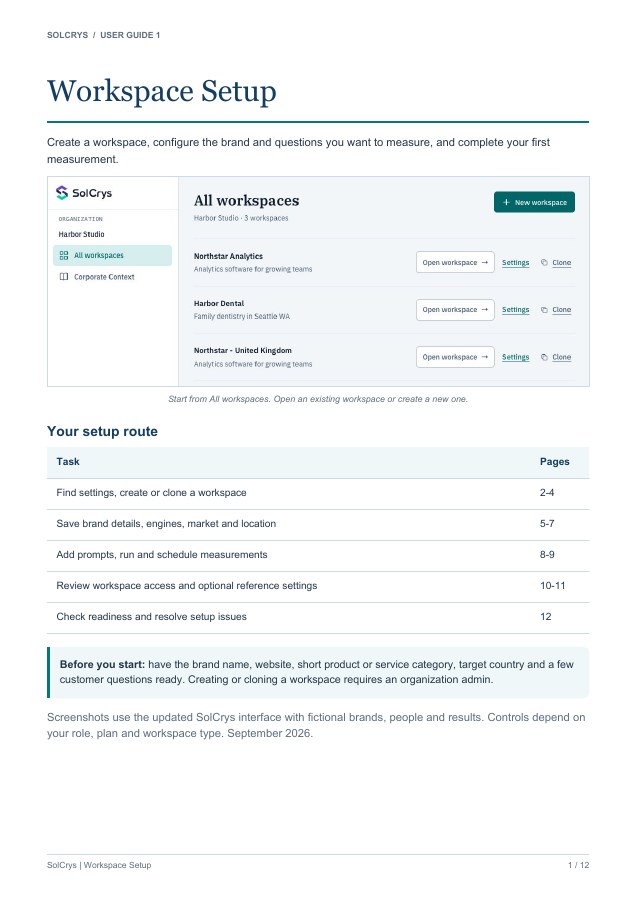
SOLCRYS / USER GUIDE 1 Workspace Setup Create a workspace, configure the brand and questions you want to measure, and complete your first measurement. Start from All workspaces. Open an existing workspace or create a new one. Your setup route Task Pages Find settings, create or clone a workspace 2-4 Save brand details, engines, market and location 5-7 Add prompts, run and schedule measurements 8-9 Review workspace access and optional reference settings 10-11 Check readiness and resolve setup issues 12 Before you start: have the brand name, website, short product or service category, target country and a few customer questions ready. Creating or cloning a workspace requires an organization admin. Screenshots use the updated SolCrys interface with fictional brands, people and results. Controls depend on your role, plan and workspace type. September 2026. SolCrys | Workspace Setup 1 / 12
- Page 2: Find your workspace and settings
Navigate organizations, workspaces, and settings tabs.
Read page 2 as text
SOLCRYS / GET STARTED Find your workspace and settings 1. Open All workspaces. With one organization, sign-in takes you directly to this list or your last workspace. If you belong to several organizations, use the organization menu to switch. 2. Select Settings beside the workspace you need. From a workspace page, select Workspace settings in the sidebar. Use the workspace name to switch brands. Workspace settings keeps the selected brand and its setup tabs together. Settings tab Use it for General Brand identity, owned domains, AI engines, market and tracked competitors. Local Business Business location and serving area, when available. Country also sets the measurement market. Prompt setup Suggest, add, import and manage the questions to measure. Operations Run measurements, save a schedule, control workspace access or archive a workspace. Corporate Context Review reference content available to the workspace. Answer Accuracy Choose the brand-specific questions and references used for accuracy checks, when enabled. On mobile: open the navigation drawer to reach All workspaces or Workspace settings. Swipe the settings tab row horizontally to find more tabs. Save or discard each edited section before leaving. SolCrys | Workspace Setup 2 / 12
- Page 3: Create your first workspace
Start with a website scan or enter your brand details manually.
Read page 3 as text
SOLCRYS / WORKSPACE MANAGEMENT Create your first workspace For organization admins. Open All workspaces → New workspace. You can also choose New workspace from the workspace menu. Confirm the organization shown at the top. Website setup scans a URL in the market you choose. 1. If asked for a workspace type, choose Generic AI for AI answer engines, then Continue. 2. Choose URL, enter your real company website, select Market, then select Scan. 3. Review any detected brand, category or location details. Correct them before confirming, then keep setup open while it finishes. 4. When ready, select View Full Report. Review the saved settings and questions before relying on the initial results. Prefer manual setup? Choose Manual. Enter Brand name, a short Product/Service Category and Market, then select Start. Aim for a specific 2-8 word category such as “Analytics software for growing teams”. If scanning fails, use Try Again or Set up manually. If setup says the workspace already exists and offers Go to Workspace, open it instead of creating a duplicate. SolCrys | Workspace Setup 3 / 12
- Page 4: Clone a workspace
Reuse a configuration for a new market or scenario; review access and run a fresh measurement.
Read page 4 as text
SOLCRYS / WORKSPACE MANAGEMENT Clone a workspace for a new scenario For organization admins. Cloning is useful when a second workspace should begin with similar settings and questions, such as a separate market for the same brand. Clone is visible beside each workspace in the directory. 1. Save any changes in the original workspace. Open All workspaces → Clone, or use Clone workspace in the Workspace settings header. 2. The copy opens in settings with “(copy)” in its name. Rename it and select Save brand identity. For a UK comparison, use “Northstar Analytics - UK”. 3. Check the target brand, category, domains, AI engines, market, competitors and prompts. Update only the details that belong to the new scenario, saving each section. 4. Review Operations → Workspace access before sharing the copy. Reconnect any integrations the copy needs. 5. Run a new measurement. Enable and save a schedule only when the copy is ready. What to expect After cloning Starting configuration Settings and prompts provide a starting point in the same organization. Results and history The copy starts without the original measurement history. Automatic measurements Auto-Schedule is off. Who can open it Access resets to all organization members. Review this for client-specific work. Connected services Integration credentials are not copied. A clone is a separate workspace. It does not move the original into another organization, and it does not include unsaved edits. SolCrys | Workspace Setup 4 / 12
- Page 5: Save brand identity and settings
Set the brand, category, aliases, and owned domains. Save each section separately.
Read page 5 as text
SOLCRYS / WORKSPACE SETTINGS Save each settings section A changed section shows Unsaved changes and its own Save and Discard controls. 1. Select Workspace settings → General. Edit the fields in one section. 2. Select that section's save button, such as Save brand identity. Wait for Saved before moving on. 3. If another section still shows Unsaved changes, save or discard that section separately. Saving one section does not save every draft on the page. 4. Use Discard changes to return that section to its last saved values. Save or discard your work before leaving the page. Set up the brand identity Field What to enter Workspace Name A recognizable team label, optionally including market or location. Target Brand The brand name to identify in AI answers. Product/Service Category A specific, short description of what the brand offers. Brand Aliases Common alternate names, separated by commas. Owned Domains The brand's own domains, separated by commas. These help identify citations to your websites. Controls depend on your role. Editors can update some brand details; admin-only settings may be unavailable. A disabled Save button usually means that section has no changes or needs a valid value. SolCrys | Workspace Setup 5 / 12
- Page 6: Choose engines, market and competitors
Choose what to measure and save your market and discovery settings.
Read page 6 as text
SOLCRYS / WORKSPACE SETTINGS Choose engines, market and competitors AI Engines and Market have separate save controls. AI engines In General → AI Engines, select the engines you want to measure, then select Save AI engines. The available engines depend on your plan. Keep the engine selection consistent when comparing performance over time. Market In General → Market, select the country and choose Save market. Review Change market? and confirm with Change to [country]. Local business workspaces manage country under Local Business instead. A market change applies to future measurements. Existing results remain in their original market, and saving the market does not start a new measurement. Review the questions, then use Operations → Run Now. Tracked competitors Use Add to track relevant competitors. Dismiss names you do not want; dismissed names are not automatically re-added. If duplicate entries describe the same brand, select them and use the available merge action. Competitor list actions save immediately. The Discover competitors automatically switch has its own Save discovery settings button. For a separate ongoing country comparison, consider cloning instead of repeatedly changing one workspace's market. SolCrys | Workspace Setup 6 / 12
- Page 7: Set up a local business
Save the business location and, when available, its serving area.
Read page 7 as text
SOLCRYS / WORKSPACE SETTINGS Set up a local business For a local business, Country also sets the measurement market. 1. Select the local workspace, then open Workspace settings → Local Business. 2. In Business location, enter the City, State / Region and Country where the business is based. 3. Select Save location. Review the change and choose Confirm location change when prompted. Country also sets the market for future measurements; past measurements are kept. 4. Review Prompt setup after changing location. Check that city, region and service-area references still match your customers. Run a new measurement for the revised setup. If serving-area controls are available Choose the Business category. Select Set serving area or Change, choose City area, Metro or Region, and enter a clear area name. Select Use this area, then Save and confirm the serving-area change. Use this area puts the choice into the form; it is not the final save. Use Reset to discard an unwanted draft where that control is shown. Location and serving area answer different questions. A Seattle dental practice may be based in Seattle and serve a wider metro area. Changing its serving area does not move its address or independently change its country. SolCrys | Workspace Setup 7 / 12
- Page 8: Build your prompt set
Suggest questions, add them manually, or import a CSV.
Read page 8 as text
SOLCRYS / PROMPT SETUP Build your prompt set Open Workspace settings → Prompt setup. Prompts are the customer questions your workspace will measure. Confirm your saved market and location first. Choose Suggest prompts, Add manually or Import CSV. Suggest questions from a website or keywords 1. Choose Suggest prompts. Enter a URL or keywords, select a batch size and generation focus, then select Start. 2. Review any detected details and the suggested questions. Select the ones you want, then choose Add [number] to workspace to keep the existing set. Use Replace all only when you intend to replace the active set. Confirm Replace prompts after reviewing the warning; existing active questions will be deactivated. Add manually or import a list Add manually: write a complete customer question, set its priority, brand-specific status and category, then select Save. Add a persona or tags if useful. Import CSV: follow the template or column guidance, select a file up to 2 MB, review the preview and confirm the rows to import. Search or filter the table and check the active switches before measuring. Disabled questions do not use active prompt slots. Include discovery, comparison and brand questions; avoid near-duplicates. The sidebar Prompts page is for measured answers and performance. SolCrys | Workspace Setup 8 / 12
- Page 9: Measure now and set a schedule
Run a measurement, check completion, and save a daily or weekly schedule.
Read page 9 as text
SOLCRYS / MEASUREMENT Measure now and set a schedule Use Pipeline Runs to start and check measurements. Complete the first measurement 1. Save the brand, engines and market, then confirm the intended questions are active. 2. Open Workspace settings → Operations → Pipeline Runs. Check the remaining manual-run allowance, then select Run Now. 3. Wait for completion. Check the date, market, prompt count and response count. If a run fails, read the message and use Retry when offered. 4. Open Visibility. Select a date range that includes the completed run and confirm Last run and Measured from. Keep measurements running 1. In Operations → Measurement schedule, choose Daily or Weekly. The current schedules are daily at 06:00 UTC or Mondays at 06:00 UTC. 2. Turn Auto-Schedule on and select Save schedule. To pause, turn it off and save again. Cloned workspaces start with it off. Save and run are separate actions. Saving settings does not start a measurement. UTC is not your local time. Run duration and available controls depend on workload, role and plan; an in-progress run is not a zero-performance result. SolCrys | Workspace Setup 9 / 12
- Page 10: Control access and archive old work
Manage workspace access and archive workspaces you no longer need.
Read page 10 as text
SOLCRYS / WORKSPACE ADMINISTRATION Control access and archive old work Workspace access is separate from inviting someone to the organization. Limit who can open a workspace 1. Open Workspace settings → Operations → Workspace access. 2. Open to all allows every organization member. Custom access limits other members to the list; organization admins retain access to every workspace. 3. Choose Restrict to specific people or Manage who can access. Add or remove existing members. Changes apply immediately. Done only closes the editor. 4. Use Reset to default access when the workspace should again be open to all organization members. Ask an organization admin to add anyone missing from the member list. Archive a workspace you no longer use In Operations → Danger Zone, choose Archive Workspace. Read the confirmation and select Confirm Archive only when the team no longer needs it in normal navigation or reports. Archiving hides the workspace for all users while preserving its data. Contact a system administrator if it needs to be restored. Cloned workspaces start open to all organization members. Check access immediately when cloning client-specific or restricted work. Do not assume the source workspace's member list was copied. SolCrys | Workspace Setup 10 / 12
- Page 11: Reference and accuracy settings
Review Corporate Context, evaluated prompts, and grounding pages.
Read page 11 as text
SOLCRYS / WORKSPACE SETTINGS Review reference and accuracy settings These settings appear when enabled for your workspace. Complete the brand, prompt and measurement setup before adding accuracy checks. Review the reference material for this workspace 1. Open Workspace settings → Corporate Context. Review the reference content available to the selected workspace. 2. Check that names, product facts and guidance match the brand you are measuring. Shared organization content may also apply to the workspace. 3. If reference material needs updating, use Edit in Corporate Context. You can also find Corporate Context directly below All workspaces in the Organization section of the sidebar. The Corporate Context settings tab lets you inspect reference content. Make sure any linked reference page applies to the correct workspace before using it for accuracy checks. Choose what Answer Accuracy evaluates 1. Open Workspace settings → Answer Accuracy when available. Enable the feature if your plan and role allow it. 2. Under Evaluated Prompts, select the brand-specific questions that need factual checking. The enable switch and evaluated-prompt switches save immediately. 3. Choose and order the relevant reference pages, then select Save grounding. Keep those pages current and specific to the chosen questions. 4. Under Expected Claims, select Generate if none exist, or View to review them. Use Wrong? Review the grounding page if a claim needs correction. 5. After a new measurement, inspect available accuracy findings alongside the actual answers. Read the evidence before deciding what to change. Some workspaces show an Answer Accuracy card in General instead of a dedicated tab. That card uses Save answer accuracy. Follow the save control shown on your screen. SolCrys | Workspace Setup 11 / 12
- Page 12: Readiness checklist and troubleshooting
Confirm setup is ready and resolve common issues.
Read page 12 as text
SOLCRYS / QUICK REFERENCE Finish setup with confidence Ready for your first review Confirm these six items: 1. The selected workspace is the right brand and market. 2. Brand identity, domains, engines and location are saved. 3. The active questions match real customer needs. 4. At least one measurement has completed. 5. The people reviewing results have workspace access. 6. Any automatic measurement schedule is saved. Common setup issues What you see What to do Workspace or settings missing Check the selected organization and workspace. Ask an admin to confirm your role and workspace access. Save is disabled Check required fields, whether the section changed, and whether you have permission to edit it. Website scan failed Read the message and use Try Again or Set up manually. Open an already-created workspace instead of duplicating it. Questions have no results Confirm they are active and were included in a completed measurement. Adding questions does not run them. New market has no results Save the market, review prompts and run a new measurement. Earlier results stay in their original market. Clone has no history Cloning copies a starting setup, not the original measurement history. Review access and run its first measurement. Next: AEO dashboards and tools Open Visibility for the first results review. Use the companion AEO Dashboards and Tools guide to interpret metrics, investigate questions and citations, and turn findings into actions. For help, share the workspace name, the page, the time of the issue and the displayed message. Include a screenshot of the affected control when useful. SolCrys | Workspace Setup 12 / 12
Document preview
Open PDF (new tab) · Download PDF
Interface examples use fictional brands, people, and results. Available controls depend on your role, plan, and workspace type.
Companion guide: AEO Dashboards and Tools